
The Process


Chainsaw carving is more than just an art, it's about brining to life a piece of wood. It's about studying nature and improving with each piece completed. It is also about challenging yourself and finding new ways to do things.
We have found that the most efficient way to complete carvings is to do them in batches. This requires lengthy time for each step and gives variety to the workdays.
So, let's dive into how carvings are created!

Debarking & Drying
There are many ways that we get our logs. Sometimes they are paid for, other times they are taken from our property. We also have the partnership of local arborists, who will give us their extra logs.
Debarking marks the beginning of a quality carving. Although this process is long and tiring, it helps prevent bug infestation and makes it easier to carve. Bark will dull the chain and slow down the carving process.
The drying process can take up to a few years to be fully complete. However, a log that has been sitting for a year will still create a good carving. Often, Seth will give the carvings extra time to dry between the carving and the finishing stages.
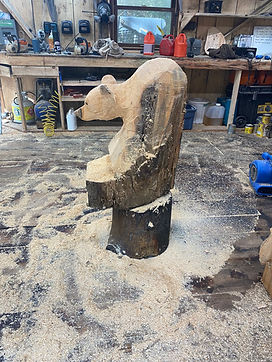
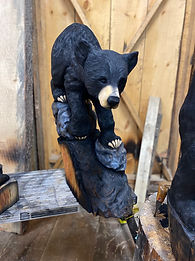
Carving
Once the logs have been debarked and dried, they are ready to carve. The carving process can take from a few hours to a few weeks. With Still saws that range from a MS500i to a small MSA140c (battery) saw, Seth can quickly and accurately rough out the shapes and add details such as feathers, claws, eyes and sometimes even lettering. Finger sanders, flap sanders and dremels are also used to help create the stunning details in his carvings.
After the carvings have been completed, they are placed in front of air movers to give them some extra drying time.
Burning and Sanding
Burning is not necessary for a chainsaw carving but it does allow for a smoother finish. Seth burns all the sections of the carvings that will be a darker color. this helps speed the sanding process and adds more depth and richness to the end coloring.
Because the carvings are burned, sanding becomes the dustiest part of the process. It can take a c ouple of days or longer with the carver in the same position all day. It also requires a respirator, which will give you a sore neck but protects your lungs.


Adding Color
Using technics such as air brushing and dry brushing, this step brings the carvings to life. Once they have been sufficiently sanded, base colors are applied. Stains are the man color sources; however acrylic paint is sometimes used as well.
From there many varying technics and methods are used to give the piece of art the most realistic look possible.
Clear Coating & Completion
The first coat of clear coat is the most important and the most time consuming. You need to make sure that the darker stain does not mix with the lighter areas of the carvings and that the brush does not contaminate the can of clear coat. Once it has been completed it is left to dry for a day or two. After this, two more coats are applied.
The carvings are now completed and are taken outside for pictures and names!
Each of these steps are crucial to the completion of carvings and allow these pieces of art to be of the highest quality possible. If they are properly cared for, they can last for many years.
